「TensorFlow」の版間の差分
(→標準化) |
|||
| (同じ利用者による、間の25版が非表示) | |||
| 1行目: | 1行目: | ||
| − | | [[機械学習]] | [[数学]] | [[統計]] | [[ベイズ統計]] | [[データ解析]] | [[R]] | [[Anaconda]] | [[Python NumPy]] | | + | | [[機械学習]] | [[数学]] | [[統計]] | [[ベイズ統計]] | [[データ解析]] | [[R]] | [[Anaconda]] | [[Python NumPy]] | [[TeX]] | |
{{amazon|B08YMT9K15}} | {{amazon|B08YMT9K15}} | ||
==[https://www.tensorflow.org/?hl=ja TensorFlow]== | ==[https://www.tensorflow.org/?hl=ja TensorFlow]== | ||
| 399行目: | 399行目: | ||
====バックプロパゲーション(誤差逆伝播)==== | ====バックプロパゲーション(誤差逆伝播)==== | ||
*https://thinkit.co.jp/article/15787 | *https://thinkit.co.jp/article/15787 | ||
| − | * | + | *配降下法では、ネットワーク内の全ての重みについて<math>\frac{{\partial}E}{{\partial}W}</math>を計算しなければいけない |
| + | *一度に計算するのではなく、出力層のニューロンから目的のニューロンまでの経路で得られる様々な偏微分の値を用いて計算を可能にする | ||
| + | *具体的には「[https://manabitimes.jp/math/1303 連鎖律の原理]」という非常に強力な微分の法則を用いる | ||
| + | *[https://manabitimes.jp/math/936 合成関数の微分] | ||
| + | *具体例 | ||
| + | |||
| + | <math>y(w_1,w_2) = ({w_1}{x_1} + {w_2}{x_2})^2</math> | ||
| + | |||
| + | *<math>w_1,w_2</math>の関数を考えたとき<math>y(w_1,w_2)</math>を2つの関数の合計とみなす | ||
| + | |||
| + | <math>y = s^2</math> | ||
| + | |||
| + | <math>s = {w_1}{x_1} + {w_2}{x_2}</math> | ||
| + | |||
| + | ===データの標準化=== | ||
| + | *勾配法によるパラーメータの更新は状況によってはなかなか収束しないことがある。 | ||
| + | *パラメータの収束を早める措置として標準化を行う。 | ||
| + | *標準化を行い、平均=0、標準偏差=1のデータに変換することで、データスケールを小さくする効果がある | ||
| + | ====[https://cognicull.com/ja/62vb4xyx 分散]==== | ||
| + | *[https://cognicull.com/ja/62vb4xyx 分散] | ||
| + | *偏差平方和をデータの個数で割ったもの | ||
| + | ====[https://cognicull.com/ja/et7cim2q 標準偏差]==== | ||
| + | *[https://cognicull.com/ja/et7cim2q 標準偏差] | ||
| + | *分散の平方根 | ||
| + | *データのばらつき具合を表しています。平均から大きく離れているデータが多ければ多いほど、標準偏差は大きくなります | ||
| + | ====標準化==== | ||
| + | *個々のデータの偏差が、標準偏差いくつ分かを求める | ||
| + | *標準正規分布 | ||
| + | |||
| + | <math> | ||
| + | 標準化 = \frac{データ - 平均}{標準偏差} | ||
| + | </math> | ||
==Tips== | ==Tips== | ||
2021年11月19日 (金) 12:08時点における最新版
| 機械学習 | 数学 | 統計 | ベイズ統計 | データ解析 | R | Anaconda | Python NumPy | TeX |
TensorFlow
- Googleが公開した機械学習フレームワーク
- 便利なPython APIと比較すると劣るがC++ APIを備える
- すべての数学は抽象化される
- TensorBoardというインタラクティブ=な可視化環境
- 機械学習のためのアルゴリズムを関数やメソッドとしてライブラリにまとめているので、機械学習のためのモデルをフローチャートとして記述することで実装できる
- Keras:Tensorflow特有の難解なプログラミング手法を簡素化し、直感的にコーディングできるようにしたラッパーライブラリ
- Kerasのユーザー増加を鑑みコアライブラリとしての組み込みを経て、Tensorflow2.0ではAPIの一部として組み込み
ドキュメント
インストール
Anacondaでのインストール
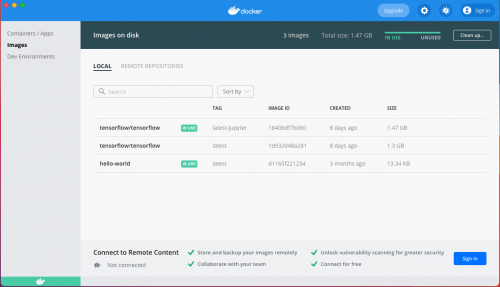
Dockerを使用したインストール
TensorFlow DockerイメージをUbuntuに構築し他ホストから接続する
 $ docker pull tensorflow/tensorflow:latest  # Download latest stable image
 $ docker run -it -p 8888:8888 tensorflow/tensorflow:latest-jupyter  # Start Jupyter server
$ docker run -it --net shared_nw --ip 192.168.0.10 -p 8888:8888 tensorflow/tensorflow:latest-jupyter
- Docker Desktopにイメージが登録された
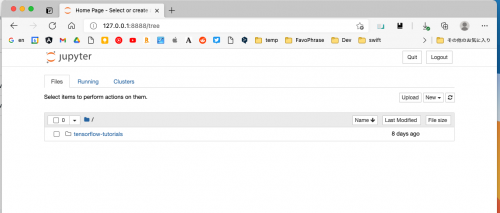
- Jupyter notebookを起動
tokenを確認
- 一度終了したコンテナを再度起動
$ docker ps -a
CONTAINER ID   IMAGE                                  COMMAND                  CREATED        STATUS                     PORTS     NAMES
92ce0f7112eb   tensorflow/tensorflow:latest-jupyter   "bash -c 'source /et…"   25 hours ago   Exited (0) 4 seconds ago             sleepy_varahamihira
$ docker start 92ce0f7112eb
92ce0f7112eb
$ docker exec -it 92ce0f7112eb /bin/bash

________                               _______________
___  __/__________________________________  ____/__  /________      __
__  /  _  _ \_  __ \_  ___/  __ \_  ___/_  /_   __  /_  __ \_ | /| / /
_  /   /  __/  / / /(__  )/ /_/ /  /   _  __/   _  / / /_/ /_ |/ |/ /
/_/    \___//_/ /_//____/ \____//_/    /_/      /_/  \____/____/|__/
- シェルからトークンを取得する
root@92ce0f7112eb:/tf# jupyter notebook list
Currently running servers:
http://0.0.0.0:8888/?token=dda07003bf50df42ccbd737ea09753318149a29a21b4ebe5 :: /tf
Visual Studio Codeからコンテナに接続
Visual Studio Code で Docker Desktop(Mac)のTensorflowコンテナの開発環境を構築(グラフ表示、コード補完)手順
テンソル
テンソルの作成
import tensorflow as tf

# 2x1行列
m1 = tf.constant([[1. , 2.]])
# 1x2行列
m2 = tf.constant([
    [1],
    [2]
])
# ランク3のテンソルを定義
m3 = tf.constant([
    [
        [1,2],
        [3,4],
        [5,6]
    ],
    [
        [7,8],
        [9,10],
        [11,12]
    ]
])

print(m1)
print(m2)
print(m3)
- 結果
tf.Tensor([[1. 2.]], shape=(1, 2), dtype=float32)
tf.Tensor(
[[1]
 [2]], shape=(2, 1), dtype=int32)
tf.Tensor(
[[[ 1  2]
  [ 3  4]
  [ 5  6]]

 [[ 7  8]
  [ 9 10]
  [11 12]]], shape=(2, 3, 2), dtype=int32)
テンソル初期化
- 5×5のテンソルを0.25で初期化
m4 = tf.ones([5,5]) * 0.25
print(m4)
- 結果
tf.Tensor(
[[0.25 0.25 0.25 0.25 0.25]
 [0.25 0.25 0.25 0.25 0.25]
 [0.25 0.25 0.25 0.25 0.25]
 [0.25 0.25 0.25 0.25 0.25]
 [0.25 0.25 0.25 0.25 0.25]], shape=(5, 5), dtype=float32)
演算子
- 使用例
x = tf.constant([[1,2]])
nx = tf.negative(x)
print(nx)
- 結果
tf.Tensor([[-1 -2]], shape=(1, 2), dtype=int32)
| 演算子 | 内容 | 備考 |
|---|---|---|
| tf.add(x,y) | 同じ型のTensorを足し算 | |
| tf.subract(x,y) | 同じ型のTensorを引き算 | |
| tf.multiply | 2つのTensorに対して行列の積を求める | |
| tf.pow(x,y) | xの要素ごとにy乗 | |
| tf.exp(x) | xの指数を要素ごとに計算します。[math]\displaystyle{ y=e^x }[/math] | |
| tf.sqrt(x) | xの平方根を求める | |
| tf.div(x,y) | xとyの要素ごとの除算 | |
| tf.truediv | xとyの要素ごとの除算(Python 3 の除算演算子のセマンティクスを使用) | |
| tf.floordiv | xとyの要素ごとの除算を行い整数に丸める | |
| tf.mod(x,y) | 要素ごとの剰余 |
コードをグラフとして理解
- 全ての演算子をノードとして考える
- ノード間の辺は数学関数の構成
- データは矢印を通って流れる
セッション
- https://www.tensorflow.org/guide/effective_tf2?hl=ja
- TensorFlow 1.X では、ユーザーは tf.* API 呼び出しを行って、手動で抽象構文木(グラフ)を作成する必要がありました
- API を呼び出したら、出力テンソルと入力テンソルのセットを session.run() 呼び出しに渡して、手動で抽象構文木をコンパイルする必要があった
- TensorFlow 2.0 はこれを逐次的に実行(Python が通常行うのと同じように)し、グラフとセッションは実装の詳細のような感覚になっています
# TensorFlow 1.X
outputs = session.run(f(placeholder), feed_dict={placeholder: input})
# TensorFlow 2.0
outputs = f(input)
変数
- 変数は tf.Variable クラスを介して作成および追跡されます。tf.Variable は、そこで演算を実行して値を変更できるテンソルを表します。特定の演算ではこのテンソルの値の読み取りと変更を行うことができます。
import tensorflow as tf

raw_data = [1.,2.,8.,-1.,0.,5.5,6.,13]
spike = tf.Variable(False)

for i in range(1, len(raw_data)):
    if raw_data[i] - raw_data[i - 1] > 5:
        spike.assign(True)
    else:
        spike.assign( False)
    print(f"Spike {spike.numpy()}")
- 結果
Spike False
Spike True
Spike False
Spike False
Spike True
Spike False
Spike True
保存と読み込み
- トレーニングのチェックポイント
- 「TensorFlow のモデルを保存する」という言いまわしは通常、次の 2 つのいずれかを意味します。
- チェックポイント
- 保存されたモデル(SavedModel)
チェックポイント
- チェックポイントは、モデルで使用されるすべてのパラメータ(tf.Variableオブジェクト)の正確な値をキャプチャします
- チェックポイントにはモデルで定義された計算のいかなる記述も含まれていないため、通常は、保存されたパラメータ値を使用するソースコードが利用可能な場合に限り有用
- TensorFlow 1.xのtf.compat.v1.train.Saverが変数名ベースのチェックポイントを読み書きするのとは対照的に、Checkpoint.save()とCheckpoint.restore()はオブジェクトベースのチェックポイントを読み書きします。
SavedModel
- パラメータ値(チェックポイント)に加え、モデルで定義された計算のシリアライズされた記述が含まれています。
- モデルを作成したソースコードから独立
- TensorFlow Serving、TensorFlow Lite、TensorFlow.js、または他のプログラミング言語のプログラム(C、C++、Java、Go、Rust、C# などの TensorFlow API)を介したデプロイに適している
Keras: Pythonの深層学習ライブラリ
- TensorFlow上で実行可能な高水準のニューラルネットワークライブラリ
- 迅速な実験を可能にすることに重点
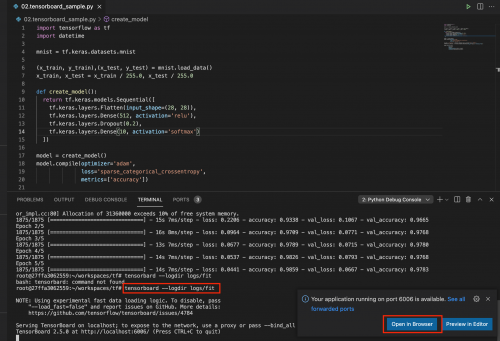
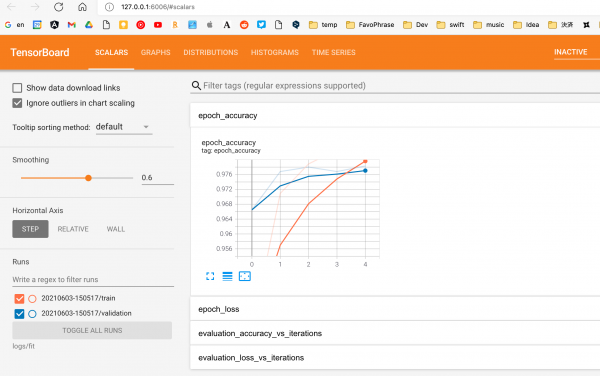
TensorBoard
- 機械学習の実験に必要な可視化機能とツールを提供
import tensorflow as tf
import datetime

mnist = tf.keras.datasets.mnist

(x_train, y_train),(x_test, y_test) = mnist.load_data()
x_train, x_test = x_train / 255.0, x_test / 255.0

def create_model():
  return tf.keras.models.Sequential([
    tf.keras.layers.Flatten(input_shape=(28, 28)),
    tf.keras.layers.Dense(512, activation='relu'),
    tf.keras.layers.Dropout(0.2),
    tf.keras.layers.Dense(10, activation='softmax')
  ])

model = create_model()
model.compile(optimizer='adam',
              loss='sparse_categorical_crossentropy',
              metrics=['accuracy'])

log_dir = "logs/fit/" + datetime.datetime.now().strftime("%Y%m%d-%H%M%S")
tensorboard_callback = tf.keras.callbacks.TensorBoard(log_dir=log_dir, histogram_freq=1)

model.fit(x=x_train,
          y=y_train,
          epochs=5,
          validation_data=(x_test, y_test),
          callbacks=[tensorboard_callback])
- 起動
# tensorboard --logdir logs/fit
Sample
テンソルの作成
- リストまたはNumPy配列からテンソルを作成
    np.set_printoptions(precision=3)
    a = np.array([1, 2, 3], dtype=np.int32)
    b = [4, 5, 6]
    t_a = tf.convert_to_tensor(a)
    t_b = tf.convert_to_tensor(b)
    print(t_a)
    print(t_b)
- 結果
tf.Tensor([1 2 3], shape=(3,), dtype=int32)
tf.Tensor([4 5 6], shape=(3,), dtype=int32)
テンソルが参照している値にアクセス
- 単にテンソルで、NumPyのメソッドを呼び出すだけ
print(t_a.shape)
- 結果
(3,)
定数値のテンソルの作成
    const_tensor = tf.constant([1, 2, 5 ,np.pi], dtype=tf.float32)
    print(const_tensor)
- 結果
tf.Tensor([1. 2. 5. 3.142], shape=(4,), dtype=float32)
テンソルのデータ型と形状を操作
データ型を変換
キャスト(cast)
    t_a_new = tf.cast(t_a, tf.int64);
    print(t_a_new.dtype)
- 結果
<dtype: 'int64'>
転置(transpose)
    t = tf.random.uniform(shape=(3, 5))
    t_tr = tf.transpose(t)
    print (t.shape, ' --> ', t_tr.shape)
- 結果
(3, 5) --> (5, 3)
線形回帰分析
回帰式
[math]\displaystyle{ y = ax + b }[/math]
最小二乗法
求め方
- 数式展開
- 勾配降下法による近似解
関数の最小点を見つけることを機械学習の分野では最適化問題、最適化と呼び、最適化を行う対象は関数なので、これを目的関数と呼ぶ 回帰分析で残差平方[math]\displaystyle{ {\varepsilon}^2 }[/math]を表す式
残差平方和 J (データと直線の差の二乗和)を表す目的関数
[math]\displaystyle{ J = \sum_{i=1}^{n}\{{y}_{i}-(ax_i+b)\}^2 }[/math]
- プログラムで扱いやすいように未知のaとbを[math]\displaystyle{ \theta }[/math]を利用して以下とする
[math]\displaystyle{ f_\theta(x) = \theta_0 + \theta_1{x} }[/math]
- [math]\displaystyle{ E(\theta) }[/math]とすれば目的関数を以下のようにあわらすことができる。([math]\displaystyle{ \frac{1}{2} }[/math]は計算をしやすくするためだけで影響はない)
[math]\displaystyle{ E(\theta) = \frac{1}{2}\sum_{i=1}^{n}\{{y}_{i}-f_\theta(x_i)\}^2 }[/math]
勾配降下法
- 勾配法は繰り返しの計算により近似的な値を求める計算法、関数が描く曲線の最小値を求める手法を特に勾配降下法とよぶ
- 勾配降下法では、微分によってえられた導関数の符号と逆方向へxを向かわせることでf(x)を最小に向かわせるのが、次式
[math]\displaystyle{ x := - {\eta}\frac{d}{dx}{f(x)} }[/math]
- η は学習率と呼ばれる正の定数で、学習によって最小値に収束する速さを調整する
- E(θ)に含まれる[math]\displaystyle{ f_{\theta}({x_i}) }[/math]は、[math]\displaystyle{ {\theta}_0 }[/math]、[math]\displaystyle{ {\theta}_1 }[/math]の2つのパラメータを持つ二次関数のため、偏微分となり次式のようになる
[math]\displaystyle{ {\theta}_0 := {\theta}_0 - {\eta}\frac{{\partial}E}{{\partial}{\theta}_0} }[/math]
[math]\displaystyle{ {\theta}_1 := {\theta}_1 - {\eta}\frac{{\partial}E}{{\partial}{\theta}_1} }[/math]
バックプロパゲーション(誤差逆伝播)
- https://thinkit.co.jp/article/15787
- 配降下法では、ネットワーク内の全ての重みについて[math]\displaystyle{ \frac{{\partial}E}{{\partial}W} }[/math]を計算しなければいけない
- 一度に計算するのではなく、出力層のニューロンから目的のニューロンまでの経路で得られる様々な偏微分の値を用いて計算を可能にする
- 具体的には「連鎖律の原理」という非常に強力な微分の法則を用いる
- 合成関数の微分
- 具体例
[math]\displaystyle{ y(w_1,w_2) = ({w_1}{x_1} + {w_2}{x_2})^2 }[/math]
- [math]\displaystyle{ w_1,w_2 }[/math]の関数を考えたとき[math]\displaystyle{ y(w_1,w_2) }[/math]を2つの関数の合計とみなす
[math]\displaystyle{ y = s^2 }[/math]
[math]\displaystyle{ s = {w_1}{x_1} + {w_2}{x_2} }[/math]
データの標準化
- 勾配法によるパラーメータの更新は状況によってはなかなか収束しないことがある。
- パラメータの収束を早める措置として標準化を行う。
- 標準化を行い、平均=0、標準偏差=1のデータに変換することで、データスケールを小さくする効果がある
分散
- 分散
- 偏差平方和をデータの個数で割ったもの
標準偏差
- 標準偏差
- 分散の平方根
- データのばらつき具合を表しています。平均から大きく離れているデータが多ければ多いほど、標準偏差は大きくなります
標準化
- 個々のデータの偏差が、標準偏差いくつ分かを求める
- 標準正規分布
[math]\displaystyle{ 標準化 = \frac{データ - 平均}{標準偏差} }[/math]
Tips
The kernel appears to have died. It will restart automatically.
- これだけだと原因は分からないのですが、 コンソールからPythonを起動し、同じコードをコピペして実行
>>> import tensorflow
Illegal instruction (core dumped)
© 2006 矢木浩人


