「Multipass」の版間の差分
ナビゲーションに移動
検索に移動
| 19行目: | 19行目: | ||
PS C:\Programs\PSTools> & .\PsExec.exe -s -i 'C:\Program Files\Oracle\VirtualBox\VirtualBox.exe' | PS C:\Programs\PSTools> & .\PsExec.exe -s -i 'C:\Program Files\Oracle\VirtualBox\VirtualBox.exe' | ||
</pre> | </pre> | ||
| + | [[File:multipass_win_virtualbox.png|600px]] | ||
===インスタンスの作成と開始=== | ===インスタンスの作成と開始=== | ||
2021年3月3日 (水) 15:20時点における版
| MicroK8s | VirtualBox|
目次
Multipass
Install
Windows
- インストーラをダウンロード
- 管理者として実行
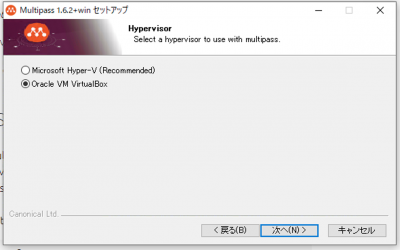
- 途中で、Hyper-V もしくは VirtualBox を選択
WindowsでMultipassを利用する
- https://multipass.run/docs/using-virtualbox-in-multipass-windows
- https://xtech.nikkei.com/it/article/COLUMN/20120601/399944/
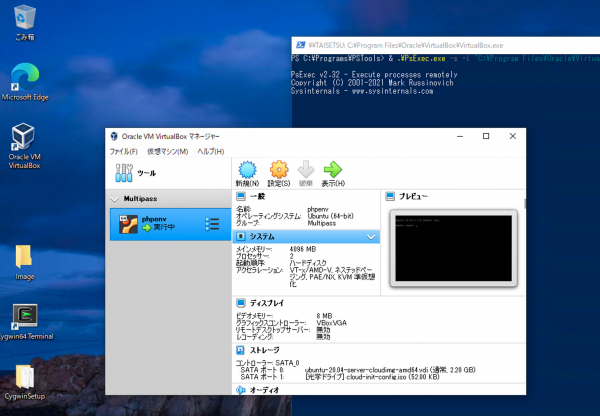
VirtualBox管理画面に、Multipassを表示する
- PsExecをダウンロードし解凍、PowerShellを管理者で実行し、解凍PsExecで、VirtualBoxを起動
- https://docs.microsoft.com/en-us/sysinternals/downloads/psexecPsExec
PS C:\Programs\PSTools> & .\PsExec.exe -s -i 'C:\Program Files\Oracle\VirtualBox\VirtualBox.exe'
インスタンスの作成と開始
$ multipass launch --mem 8G --disk 40G --cpus 2 --name primary
Windowsの場合インスタンス場所
C:\Windows\System32\config\systemprofile\AppData\Roaming\multipassd\virtualbox\vault\instances
コマンド
ls
- インスタンスの列挙
$ multipass ls
Name                    State             IPv4             Image
microk8s-vm             Running           192.168.64.2     Ubuntu 18.04 LTS
shell
- インスタンスにログイン
$ multipass shell microk8s-vm
Welcome to Ubuntu 18.04.5 LTS (GNU/Linux 4.15.0-122-generic x86_64)
   :
ubuntu@microk8s-vm:~$
ローカルドライブをマウント
- マウント
$ multipass mount $HOME/Workspaces/microk8s microk8s-vm:/home/ubuntu/manifest
- 確認
$ multipass info microk8s-vm
Name:           microk8s-vm
State:          Running
IPv4:           192.168.64.2
Release:        Ubuntu 18.04.5 LTS
Image hash:     a85c3190d0bb (Ubuntu 18.04 LTS)
Load:           0.79 0.95 1.02
Disk usage:     3.1G out of 48.3G
Memory usage:   1.0G out of 3.9G
Mounts:         /Users/hirotoyagi/Workspaces/microk8s => /home/ubuntu/manifest
                    UID map: 501:default
                    GID map: 20:default
- 解除
$ multipass unmount microk8s-vm
Tips
現在選択されているドライバを確認する
$ sudo multipass get local.driver
hyperkit
ドライバをVirtualBoxに変更
$ sudo multipass set local.driver=virtualbox
$ sudo VBoxManage list vms
Password:
"microk8s-vm" {d90718db-3795-4116-825f-cffe4a2f0fea}
$ VBoxManage list bridgedifs | grep ^Name:
Name:            en0: Wi-Fi (AirPort)
Name:            en1: Thunderbolt 1
Name:            bridge0
Name:            p2p0
Name:            awdl0
Name:            llw0

$ sudo VBoxManage modifyvm microk8s-vm --nic2 bridged --bridgeadapter2 en0
- インスタンスを立ち上げて新しいNICの名前(enp0s8)を得る
$ multipass exec microk8s-vm ip link | grep DOWN
3: enp0s8:  mtu 1500 qdisc noop state DOWN mode DEFAULT group default qlen 1000
- 新しいNIC(enp0s8)の設定
$ multipass exec -- microk8s-vm sudo bash -c "cat > /etc/netplan/60-bridge.yaml" <<EOF
network:
  ethernets:
    enp0s8:                  # this is the interface name from above
      dhcp4: true
      dhcp4-overrides:       # this is needed so the default gateway
        route-metric: 200    # remains with the first interface
  version: 2
EOF

$ multipass exec microk8s-vm sudo netplan apply
$ multipass exec microk8s-vm ip address show dev enp0s8 up
3: enp0s8: <BROADCAST,MULTICAST,UP,LOWER_UP> mtu 1500 qdisc fq_codel state UP group default qlen 1000
    link/ether 08:00:27:3a:92:dd brd ff:ff:ff:ff:ff:ff
    inet 192.168.0.40/24 brd 192.168.0.255 scope global dynamic enp0s8
       valid_lft 86331sec preferred_lft 86331sec
    inet6 2402:6b00:3666:5800:a00:27ff:fe3a:92dd/64 scope global dynamic mngtmpaddr noprefixroute
       valid_lft 266sec preferred_lft 266sec
    inet6 fe80::a00:27ff:fe3a:92dd/64 scope link
       valid_lft forever preferred_lft forever
$ microk8s add-node
From the node you wish to join to this cluster, run the following:
microk8s join 10.0.2.15:25000/136ac2967078d5490de2d1a2d3a8bf52

If the node you are adding is not reachable through the default interface you can use one of the following:
 microk8s join 10.0.2.15:25000/136ac2967078d5490de2d1a2d3a8bf52
 microk8s join 192.168.0.40:25000/136ac2967078d5490de2d1a2d3a8bf52
Mac+Multipass+MicroK8s+Virtual Boxでネットワークブリッジを構成する
© 2006 矢木浩人

