「MicroK8s」の版間の差分
| 489行目: | 489行目: | ||
</pre> | </pre> | ||
====PersistentVolume生成==== | ====PersistentVolume生成==== | ||
| + | In this exercise, you create a hostPath PersistentVolume. Kubernetes supports hostPath for development and testing on a single-node cluster. A hostPath PersistentVolume uses a file or directory on the Node to emulate network-attached storage. | ||
| + | |||
| + | In a production cluster, you would not use hostPath. Instead a cluster administrator would provision a network resource like a Google Compute Engine persistent disk, an NFS share, or an Amazon Elastic Block Store volume. Cluster administrators can also use StorageClasses to set up dynamic provisioning. | ||
| + | |||
| + | Here is the configuration file for the hostPath PersistentVolume: | ||
| + | |||
| + | TODO | ||
==StatefulSet== | ==StatefulSet== | ||
2020年11月21日 (土) 10:01時点における版
| Kubernetes | Kubectl | Minikube | Docker | Multipass | Ubuntu |
MicroK8s
基本操作
インストール
Macにインストール
- https://jp.ubuntu.com/blog/kubernetes-on-mac-how-to-set-up-jp
- https://microk8s.io/docs/install-alternatives#heading--macos
$ brew install ubuntu/microk8s/microk8s
- DriverをVirtualBoxに変更する場合、先に変更してから、install
$ microk8s install
Ubuntuにインストール
$ sudo snap install microk8s --classic
- アンインストール
$ sudo snap remove microk8s
ステータスの確認
- microk8s status でステータスの確認
- インストール中などは、--wait-ready で状況確認できる
$ microk8s status --wait-ready
microk8s is running
high-availability: no
  datastore master nodes: 127.0.0.1:19001
  datastore standby nodes: none
addons:
  enabled:
    ha-cluster           # Configure high availability on the current node
  disabled:
    ambassador           # Ambassador API Gateway and Ingress
    cilium               # SDN, fast with full network policy
         :
    storage              # Storage class; allocates storage from host directory
開始と終了
- MicroK8sは、停止するまで実行し続ける。停止と開始は、以下のコマンド。
$ microk8s stop
$microk8s start
アドオンの使用
- MicroK8s は最低限のコンポーネントを使用するが、豊富な機能が "add-ons" とタイプすることで利用できる
- サービス間の連携を容易にするDNS管理、 アプリケーションがストレージが必要な場合、'storage' アドオンはホストに直接領域を提供する。これらは簡単にセットアップできる
サービスの有効化/無効化
- 組み込みで有効化可能なアドオンサービスの確認
- サービスを無効化する場合は、disable
$ microk8s enable --help
- サービスを有効化する
- status でどのアドオンが有効/無効かを確認できる
$ microk8s enable dashboard dns registry istio
コマンド
https://microk8s.io/docs/commands
| コマンド | 内容 |
| microk8s add-node | クラスタへの接続文字列を生成 |
| microk8s config | |
| microk8s ctr | |
| microk8s dbctl | |
| microk8s disable | |
| microk8s enable | |
| microk8s inspect | |
| microk8s join | |
| microk8s kubectl | |
| microk8s leave | |
| microk8s refresh-certs | |
| microk8s remove-node | |
| microk8s reset | ノードを初期状態にリセット |
| microk8s start | 停止されたノードを開始 |
| microk8s status | ステータス情報を表示 |
| microk8s stop | カレントノードの停止 |
ダッシュボード
- https://microk8s.io/docs/addon-dashboard
- https://github.com/kubernetes/dashboard/blob/master/docs/user/access-control/README.md
Kubectl
- MicroK8s は専用のバージョンのkubectlをバンドルしている。
- コマンドを監視と制御のために実行することができる。
$ microk8s kubectl get all --all-namespaces
NAMESPACE            NAME                                             READY   STATUS              RESTARTS   AGE
kube-system          pod/calico-node-m9j8n                            1/1     Running             0          90m
kube-system          pod/metrics-server-8bbfb4bdb-679mc               1/1     Running             0          7m38s
            :
- MicroK8s は、すでにインストール済みのkubectlとの衝突を防ぐためにネームスペースを指定したkubectlコマンドを使用する
- もしインストール済みの物がないのであれば、簡単にエイリアスを指定できる
- ~/.bash_aliases に以下を記載
alias kubectl='microk8s kubectl'
- ~/.bash_profile に以下を追記
if [ -f ~/.bash_aliases ]; then
    . ~/.bash_aliases
fi
Kubeconfig
- https://microk8s.io/docs/working-with-kubectl
- https://qiita.com/imamura_sh/items/91208a9b30e701d1e7f2
$ cd ~/
$ mkdir .kube
$ cd .kube
$ microk8s config > config
クラスタ
- https://kubernetes.io/ja/docs/tutorials/kubernetes-basics/
- Kubernetesクラスターは以下の2種類のリソースで構成
- マスターがクラスターを管理する、マスターはクラスターの管理を担当
- ノードがアプリケーションを動かすワーカーとなる、ノードは、Kubernetesクラスターのワーカーマシンとして機能するVMまたは物理マシン
$ kubectl cluster-info
Kubernetes master is running at https://127.0.0.1:16443

$ kubectl get nodes
NAME          STATUS   ROLES    AGE   VERSION
microk8s-vm   Ready    <none>   47h   v1.19.3-34+a56971609ff35a
Up and Deploy
Pod
作成
- 一番シンプルな方法は kubectl run
$ kubectl run nginx --image=nginx
pod/nginx created
マニフェスト
準備
- kubectl で -f したときのルートが、/home/ubuntu なので、ローカルの作業フォルダfiles をマウントする
multipass mount `pwd`/files microk8s-vm:/home/ubuntu/files
適用
- pod-nginx.yaml
apiVersion: v1
kind: Pod
metadata:
  name: nginx-pod
spec:
  containers:
    - name: nginx-container
      image: nginx:latest
      ports:
        - containerPort: 8080
          name: http
          protocol: TCP
- 適用
$ kubectl apply -f files/pod/pod-nginx.yaml
pod/nginx-pod created
確認
簡易
$ kubectl get pods
NAME        READY   STATUS    RESTARTS   AGE
nginx-pod   0/1     Unknown   3          91m
詳細
以下の内容が表示される
- 基本情報
- Pod内で動いているコンテナ情報
- Podに関するイベント情報
$ kubectl describe pod nginx-pod
Name:         nginx-pod
Namespace:    default
Priority:     0
Node:         microk8s-vm/192.168.64.2
Start Time:   Wed, 18 Nov 2020 22:43:16 +0900
Labels:       <none>
Annotations:  cni.projectcalico.org/podIP: 10.1.254.126/32
              cni.projectcalico.org/podIPs: 10.1.254.126/32
Status:       Running
    :
ポートフォワード
$ kubectl port-forward pod/nginx-pod 80 80
Forwarding from 127.0.0.1:80 -> 80
Forwarding from [::1]:80 -> 80
Unable to listen on port 80: Listeners failed to create with the following errors: [unable to create listener: Error listen tcp4 127.0.0.1:80: bind: address already in use unable to create listener: Error listen tcp6 [::1]:80: bind: address already in use]
- macの場合vmに入れば、、、
ubuntu@microk8s-vm:~$ curl http://localhost:80
Handling connection for 80
<!DOCTYPE html>
<html>
<head>
<title>Welcome to nginx!</title>
<style>
    body {
        width: 35em;
        margin: 0 auto;
        font-family: Tahoma, Verdana, Arial, sans-serif;
    }
</style>
</head>
<body>
<h1>Welcome to nginx!</h1>
<p>If you see this page, the nginx web server is successfully installed and
working. Further configuration is required.</p>

<p>For online documentation and support please refer to
<a href="http://nginx.org/">nginx.org</a>.<br/>
Commercial support is available at
<a href="http://nginx.com/">nginx.com</a>.</p>

<p><em>Thank you for using nginx.</em></p>
</body>
</html>
ログの確認
$ kubectl logs nginx-pod
execでコマンド実行
- -it で対話実行
$ kubectl exec -it pod/nginx-pod -- /bin/sh
#
コンテナローカル間でファイルコピー
- ローカル のファイルを、Podにコピー
$ kubectl cp files/etc/aaa.html nginx-pod:/usr/share/nginx/html/aaa.html
- Podのファイルをローカルにコピー
$ kubectl cp nginx-pod:/usr/share/nginx/html/index.html files/etc/index.html
Service
クラスター内のアプリケーションにアクセスするために外部IPアドレスを公開
5つのPodで起動しているアプリケーションへのServiceの作成
$ kubectl apply -f https://k8s.io/examples/service/load-balancer-example.yaml
deployment.apps/hello-world created
$ kubectl get pods
NAME                           READY   STATUS              RESTARTS   AGE
hello-world-6df5659cb7-6flwb   0/1     ContainerCreating   0          45s
hello-world-6df5659cb7-lzmnx   0/1     ContainerCreating   0          45s
hello-world-6df5659cb7-ghbfs   0/1     ContainerCreating   0          45s
hello-world-6df5659cb7-jbz9t   0/1     ContainerCreating   0          45s
hello-world-6df5659cb7-fqv2z   0/1     ContainerCreating   0          45s
$ kubectl get deployment hello-world
NAME          READY   UP-TO-DATE   AVAILABLE   AGE
hello-world   5/5     5            5           3m19s
$ kubectl get replicaset
NAME                     DESIRED   CURRENT   READY   AGE
hello-world-6df5659cb7   5         5         5       5m26s
Deploymentを公開するサービスの生成
- LoadBlancerの有効化
$ microk8s enable metallb
- Deploymentの生成
$ kubectl expose deployment hello-world --type=LoadBalancer --name=my-service
service/my-service exposed
- サービスの確認
$ kubectl get service my-service
NAME         TYPE           CLUSTER-IP       EXTERNAL-IP     PORT(S)          AGE
my-service   LoadBalancer   10.152.183.120   192.168.0.120   8080:32132/TCP   20m
- 実行
$ curl http://192.168.0.120:8080
Hello Kubernetes!
- クリーンアップ
$ kubectl delete service my-service
service "my-service" deleted
$ kubectl delete deployment hello-world
deployment.apps "hello-world" deleted
PHPアプリサンプル
データストア(Radis )の作成
Radis Master Deployment
- ゲストブックアプリケーションは、データストアに、Radis を使用する
$ kubectl apply -f https://k8s.io/examples/application/guestbook/redis-master-deployment.yaml
Radis Master Service
- ゲストブックアプリケーションは、データストアと通信する必要がある
$ kubectl apply -f https://k8s.io/examples/application/guestbook/redis-master-service.yaml
Radis Slave Deployment
- Radis Slave として、レプリカを2つ作成
$ kubectl apply -f https://k8s.io/examples/application/guestbook/redis-slave-deployment.yaml
$ kubectl get pods
NAME                           READY   STATUS              RESTARTS   AGE
redis-master-f46ff57fd-lh4lh   1/1     Running             1          19m
redis-slave-bbc7f655d-5vjpb    0/1     ContainerCreating   0          13s
redis-slave-bbc7f655d-954c5    0/1     ContainerCreating   0          13s
Radis Slave Service
$ kubectl apply -f https://k8s.io/examples/application/guestbook/redis-slave-service.yaml
$ kubectl get services
NAME           TYPE        CLUSTER-IP      EXTERNAL-IP   PORT(S)    AGE
kubernetes     ClusterIP   10.152.183.1    <none>        443/TCP    33h
redis-master   ClusterIP   10.152.183.90   <none>        6379/TCP   11m
redis-slave    ClusterIP   10.152.183.62   <none>        6379/TCP   18s
ゲストブックのセットアップと公開
Frontend Development
$ kubectl apply -f https://k8s.io/examples/application/guestbook/frontend-deployment.yaml
Frontend Service
- 上記で作成した、Radis サービスは、コンテナ内部からのみアクセス可能。
- デフォルトのサービスは、ClusterIPで、ClusterIPはPodの1つのIPを差す(このIPはクラスタ内殻のみ参照可能)
- もし、ゲストをゲストブックにアクセスさせたい場合、Frontend サービスを外部に見えるようにする必要がある。
- クライアントがコンテナクラスターの外部からサービスにリクエストするためには、NodePortサービスを公開することで可能となる
LoadBalancer経由で参照する
- type を LoadBalancerに変更して、apply
apiVersion: v1
kind: Service
metadata:
  name: frontend
  labels:
    app: guestbook
    tier: frontend
spec:
  # comment or delete the following line if you want to use a LoadBalancer
  #type: NodePort
  # if your cluster supports it, uncomment the following to automatically create
  # an external load-balanced IP for the frontend service.
  type: LoadBalancer
  ports:
  - port: 80
  selector:
    app: guestbook
    tier: frontend
- URL(kubectl apply -f https://k8s.io/examples/application/guestbook/frontend-service.yaml)ではなく、上記を変更した、ローカルファイルからapplyする。
- MacでMultipass上のため、事前にマウントを実施済み
$ kubectl apply -f ./files/php_guest_book/frontend-service.yaml
$ kubectl get services
NAME           TYPE           CLUSTER-IP       EXTERNAL-IP     PORT(S)        AGE
kubernetes     ClusterIP      10.152.183.1     <none>          443/TCP        36h
redis-master   ClusterIP      10.152.183.90    <none>          6379/TCP       3h1m
redis-slave    ClusterIP      10.152.183.62    <none>          6379/TCP       169m
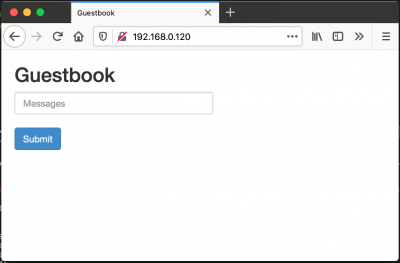
frontend       LoadBalancer   10.152.183.187   192.168.0.120   80:30334/TCP   3m10s
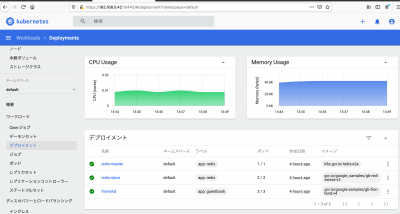
- ダッシュボード
クリーンアップ
$ kubectl delete deployment -l app=redis
$ kubectl delete service -l app=redis
$ kubectl delete deployment -l app=guestbook
$ kubectl delete service -l app=guestbook
永続ボリューム
- https://kubernetes.io/ja/docs/concepts/storage/persistent-volumes/
- ストレージを管理することはインスタンスを管理することとは全くの別物
- PersistentVolumeサブシステムは、ストレージが何から提供されているか、どのように消費されているかをユーザーと管理者から抽象化するAPIを提供
PersistentVolume (PV)
- ストレージクラスを使って管理者もしくは動的にプロビジョニングされるクラスターのストレージの一部
- Nodeと同じようにクラスターリソースの一部
- PVはVolumeのようなボリュームプラグインですが、PVを使う個別のPodとは独立したライフサイクルを持っています
- このAPIオブジェクトはNFS、iSCSIやクラウドプロバイダー固有のストレージシステムの実装の詳細を捕捉します。
PersistentVolumeClaim (PVC)
- ユーザーによって要求されるストレージで、これはPodと似ています
- PodはNodeリソースを消費し、PVCはPVリソースを消費します
- Podは特定レベルのCPUとメモリーリソースを要求することができます。クレームは特定のサイズやアクセスモード(例えば、ReadWriteOnce、ReadOnlyMany、ReadWriteManyにマウントできます
- PersistentVolumeClaimはユーザーに抽象化されたストレージリソースの消費を許可する一方、ユーザーは色々な問題に対処するためにパフォーマンスといった様々なプロパティを持ったPersistentVolumeを必要とすることは一般的なことです。
- クラスター管理者はユーザーに様々なボリュームがどのように実装されているかを表に出すことなく、サイズやアクセスモードだけではない色々な点で異なった、様々なPersistentVolumeを提供できる必要があります。これらのニーズに応えるために StorageClass リソースがあります。
チュートリアル
- クラスター管理者の場合、PersistentVolumeを物理ストレージに作成し、VolumeをPodに関連づける必要はない
- 開発者、クラスタユーザーの場合、PersistentVolumeChlaimを作成すると、自動的に適したPersistentVolumeに結び付けられる
- Podを生成し、PersistentVolumeClaimを利用することで、ストレージを利用できる
index.htmlをNodeの作成する
$ multipass sh microk8s-vm
ubuntu@microk8s-vm:~$ sudo mkdir /mnt/data
ubuntu@microk8s-vm:~$ sudo sh -c "echo 'Hello from Kubernetes storage' > /mnt/data/index.html"
PersistentVolume生成
In this exercise, you create a hostPath PersistentVolume. Kubernetes supports hostPath for development and testing on a single-node cluster. A hostPath PersistentVolume uses a file or directory on the Node to emulate network-attached storage.
In a production cluster, you would not use hostPath. Instead a cluster administrator would provision a network resource like a Google Compute Engine persistent disk, an NFS share, or an Amazon Elastic Block Store volume. Cluster administrators can also use StorageClasses to set up dynamic provisioning.
Here is the configuration file for the hostPath PersistentVolume:
TODO
StatefulSet
事前準備
StatefulSet作成
- https://raw.githubusercontent.com/kubernetes/website/master/content/en/examples/application/web/web.yaml
- ダウンロードしてapply
$ kubectl apply -f ./files/statefulset-basic/web.yaml
service/nginx created
statefulset.apps/web created
$ kubectl get services nginx
NAME    TYPE        CLUSTER-IP   EXTERNAL-IP   PORT(S)   AGE
nginx   ClusterIP   None         <none>        80/TCP    4m18s
$ kubectl get statefulset
NAME   READY   AGE
web    0/2     4m22s
Ordered Pod Creation
For a StatefulSet with n replicas, when Pods are being deployed, they are created sequentially, ordered from {0..n-1}. Examine the output of the kubectl get command in the first terminal. Eventually, the output will look like the example below.
デプロイ
Kubernetesにアプリケーションをデプロイするときは、
- マスターにアプリケーションコンテナを起動するように指示
- マスターはコンテナがクラスターのノードで実行されるようにスケジュール
- ノードは、マスターが公開しているKubernetes APIを使用してマスターと通信
- エンドユーザーは、Kubernetes APIを直接使用して対話することもできます
コンテナ化アプリケーションをデプロイ
- KubernetesのDeployment の設定を作成
- DeploymentはKubernetesにアプリケーションのインスタンスを作成し、更新する方法を指示
- Deploymentを作成すると、KubernetesマスターはDeployment内に含まれるアプリケーションインスタンスをクラスター内の個々のノードで実行するようにスケジュール
- アプリケーションインスタンスが作成されると、Kubernetes Deploymentコントローラーは、それらのインスタンスを継続的に監視
- インスタンスをホストしているノードが停止、削除された場合、Deploymentコントローラーはそのインスタンスをクラスター内の別のノード上のインスタンスと置き換え,マシンの故障やメンテナンスに対処するためのセルフヒーリングの仕組みを提供
リソースの作成
$ multipass mount `pwd` microk8s-vm:/home/ubuntu/files
- マニフェスト
sample-pod.yaml
apiVersion: v1
kind: Pod
metadata:
  name: sample-pod
spec:
  containers:
    - name: nginx-container
      image: nginx:latest
- 生成
$ kubectl create -f ./files/pod/sample-pod.yaml
pod/sample-pod created
- 確認
$ kubectl get pods
NAME         READY   STATUS    RESTARTS   AGE
sample-pod   1/1     Running   0          76s
Memo
NginxをPodとしてインストール
- Kubernetes は、appやserviceをデプロイするためにあるので、kubecltでそれらをKubernetesに対して行うことができる
- デモアプリをインストールしてみる
$ kubectl enable dns metallb
$ kubectl create deployment nginx --image=nginx
deployment.apps/nginx created
- 確認
$ kubectl get pods
NAME                     READY   STATUS    RESTARTS   AGE
nginx-6799fc88d8-c69r9   1/1     Running   0          17m
サービスとして公開
- Deploymentを確認
$ kubectl get deployment
NAME    READY   UP-TO-DATE   AVAILABLE   AGE
nginx   1/1     1            1           108m
- Deploymentに接続するために、Serviceとして公開
- https://kubernetes.io/ja/docs/concepts/services-networking/service/
- https://kubernetes.io/ja/docs/tutorials/stateless-application/expose-external-ip-address/
$ kubectl expose deployment nginx --type=LoadBalancer --name=nginx-service --port=8080
service/nginx-service exposed
- サービスを確認(EXTERNAL-IP/PORT)
$ kubectl get services
NAME            TYPE           CLUSTER-IP      EXTERNAL-IP      PORT(S)          AGE
kubernetes      ClusterIP      10.152.183.1    <none>           443/TCP          47h
nginx-service   LoadBalancer   10.152.183.63   192.168.64.100   8080:31344/TCP   33s
ポートフォワード
- 手順を確認
$ kubeclt port-forward -h
 kubectl port-forward TYPE/NAME [options] [LOCAL_PORT:]REMOTE_PORT [...[LOCAL_PORT_N:]REMOTE_PORT_N]
$ kubectl port-forward nginx-6799fc88d8-c69r9 8090:80
Forwarding from 127.0.0.1:8090 -> 80
Forwarding from [::1]:8090 -> 80
クラスタリング
- https://microk8s.io/docs/clustering
- https://tech.virtualtech.jp/entry/2019/10/25/150802
- 2つ以上のすでに稼働しているMicoroK8sインスタンスにクラスタを作成するには、add-nodeコマンドを使用
- このコマンドが実行されたMicroK8sインスタンスが、クラスタのマスターとなり、Kubernetesコントロールプレーンをホストする
サービスメッシュ
Istio
Tips
Macネットワークトラブルシュート
© 2006 矢木浩人


